Monday, 6 August 2018

Forbidden Errors in Wamp Server


Have you recently installed Wamp server? are you getting 403 forbidden error? are you looking for information on how to fix this error quickly? Don’t worry, this article can solve your problem in minutes.
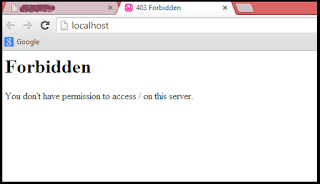
403 forbidden is the most common error being faced by developers while installing WAMP server. If you’re one who just installed Wamp server 2.2 and got this error message “403 Forbidden Error – You don’t have permission to access / on this server.”, don’t panic, you can fix this forbidden error in just 5 minutes by following these 5 simple steps.
Forbidden errors generally occur due to permission mismatch and can solve by editing .conf and .conf files. In most cases, 403 forbidden errors will occur in both “LocalHost” and “PhpMyadmin”. In this tutorial, we will explain how to solve the errors for both.

Solution to fix 403 forbidden error in Localhost

Quick Steps:

  • Open httpd.conf
  • Find text in <Directory/>  </Directory>having Deny from all and replace with Allow from all
  • Also find this code:  Order Deny, Allow, Deny from all, Allow from 127.0.0.1and replace with Order Deny, Allow Deny from all, Allow from all
  • Now restart all services of the wamp server
  • Click on localhost or goto default browser and write localhost and it will start working

Detailed Steps to fix the error:

Step 1

Open “httpd.conf” file from below path.
C:\wamp\bin\apache\apache2.2.22\conf\httpd.conf (You need to locate your drive where you have installed wamp. In this case, we have installed wamp in C drive)
Or
Open from Task Bar Icon
Left Click on Wamp Server Icon => Apache =>httpd.conf

Step 2

Find this lines from httpd.conf file
<Directory/>
Options FollowSymLinks
AllowOverride None
Order deny,allow
Deny from all

</Directory>
And replace it with
<Directory/>
Options FollowSymLinks
AllowOverride None
Order deny,allow
Allow from all

</Directory>

Step 3

Also find these code in httpd.conf file
Order Deny,Allow
Deny from all
Allow from 127.0.0.1
And replace it with
Order Deny,Allow
Deny from all
Allow from All

Save the file and close it.

Step 4

Then go to Wamp Server Icon, Right click on it and Press Restart All Services. See below image:

Step 5

In Wamp Server  click on Localhost as show in below image
OR goto your default web browser and write “Localhost” at URL
Its Done !

Solve 403 Forbidden Error in PhpMyAdmin

Here is the simple solution of Forbidden error in while you are accessing Phpmyadmin in your wamp server.

Quick Steps:

  • Open phpmyadmin.conf file
  • Find this code:  Order Deny, Allow, Deny from all, Allow from 127.0.0.1and replace with Order Deny, Allow, Deny from all, Allow from all
  • Save the file and restart all services
  • Now access PhpMyadmin from your wamp server or directly access from the default browser
  • Its done!
If you are looking for detailed steps to fix this error, follow below guidlines.

Step 1

Open “phpmyadmin.conf” file from below path (first locate your wamp installation. In our case, we have installed them in C drive)
C:\wamp\alias\phpmyadmin.conf

Step 2

In that file, you will find two similar source code in which you need to edit small portion explain below. Make sure you edit both source codes.
Find this Code
Order Deny,Allow
Deny from all
Allow from 127.0.0.1
And replace it with
Order Deny,Allow
Deny from all
Allow from all

Step 3

Now follow step 4 explained in above solution in which you need to restart all services from your wamp.

Step 4

Now, start your wamp server and click on phpmyadmin as shown in below image.
After successfully editing code and specified file, you will see below console in your web browser:

If you are still getting same error or need any other resolution, don’t hesitate to write here by comment. I will show you how to fix those errors in easy way.

403 Forbidden error on local network

Recently we received a comment from a user facing issue while accessing wamp on PC connected though local network. Here is the exact query from Vikram:
I have established a network using D-Link router. I don’t have a problem accessing WampServer instance from the machine where it is installed(say, Machine A). But, if I try to launch providing say; http://<ip-address-machine a=””> from another machine (say, Machine B)
I am getting Forbidden error. I could ping from machine B to Machine A.
Tried playing around httpd.conf … having ‘Allow from all’. 
Do you have any hint for this ?
Solution:
Later, Vikram has suggested the solution to this 403 forbidden error while accessing wamp on network device. You can resolve this issue by editing ‘httpd-vhosts.conf’ file:
Change 'Require local' to 'Require all granted'.
Friday, 3 August 2018

How to create registration form video

Saturday, 28 July 2018

How to create effective button using CSS


How to create effective button in HTML CSS

How to create registration form |with source code and CSS|HTML|php


how to create registration form


How to create registration form |with source code and CSS|HTML|php

REGISTRATION

Name
Address
City
Pincode
Email
Mobile Number
Gender Male
    Female
User Name
Password
Confirm Password


login?


Registration.html ⬇


<div id="wrapper">
<div id="form">
<h2 style="color:#5B2E00">REGISTRATION</h2>
    <form action="" method="post" >
      <table width="100%" border="0" cellspacing="10" cellpadding="0">
        <tr>
        <td>Name</td>
          <td><input type="text" name="name" class="textbox" required="required"></td>
        </tr>
        <tr>
        <td>Address</td>
        <td><textarea name="address" class="textbox" cols="35" rows="3" required="required"></textarea></td>
        </tr>
        <tr>
        <td>City</td>
          <td><select name="city" class="textbox" required="required">
              <option>     </option>
                    <option>  junagadh   </option>
                    <option> rajkot    </option>
                    <option> manavadar    </option>
                    <option>  keshod  </option>
                    <option> upleta  </option>
                    <option>bhavnagar   </option>
                    <option>  surat   </option>
                    <option>  valshad   </option>
                    <option> mumbai    </option>
                    <option>Mehsana</option>
              <option>Ahmedabad</option>
              <option>Gandhinagar</option>
            </select></td>
        </tr>
         <tr>
        <td>Pincode</td>
          <td><input type="text" name="pincode" class="textbox" required="required"></td>
        </tr>
        <tr>
          <td>Email</td>
          <td><input type="email" name="email" class="textbox" required="required"></td>
        </tr>
        <tr>
          <td>Mobile Number</td>
          <td><input type="text" name="mobile" class="textbox" required="required"></td>
        </tr>
        <tr>
          <td>Gender</td>
          <td><input type="radio" name="gender" value="male"  />Male<br />
             &nbsp;&nbsp;&nbsp; <input type="radio" name="gender" value="female"  />Female</td>
        </tr>
        <tr>
          <td>User Name</td>
          <td><input type="text" name="username" class="textbox" required="required"></td>
        </tr>
        <tr>
          <td>Password</td>
          <td><input type="password" name="password" class="textbox" required="required"></td>
        </tr>
         <tr>
          <td>Confirm Password</td>
          <td><input type="password" name="confirmpassword" class="textbox" required="required"></td>
        </tr>
        <tr>
          <td colspan="2"><br /><br /><input type="submit" name="submit" class="button" value="registration" /></td>
        </tr>
        <tr>
          <td colspan="2"><br /><a href="#" class="link">login?</a><br /><br /></td>
        </tr>
      </table>
    </form>
  </div>
</div>
</body>


Style.css ⬇


body
{
margin : 0;
padding : 0;
background:#FFF2E6;
}
#wrapper
{

}


/* registration*/
#form
{
border:1px solid #FA5;
border-radius:10px;
box-shadow:2px 2px 2px 2px #FC9;
background:linear-gradient(#FFE6CC,#FFCA95,#FFCA95,#FFC58A);
margin:5% 20% 0% 20%;
text-align:center;
font-size:20px;
color:#7D3F00;
}
.button
{
padding:12px;
background:linear-gradient(#FFCF9F,#FFAE5E,#F93,#FF8000);
border-radius:10px;
border : 1.8px solid #CE6700;
font-size:20px;
color:#FFF2E6;


}
.button:hover
{
font-size:px;
color:white;
}
.textbox
{
background-color:#FFD9B3;
border-radius:10px;
border : 1.8px solid #CE6700;
color:#532900;
padding:5px;
font-size:20px;
width:170px;
height:30px;
}
.textbox:hover
{
box-shadow:0px 0px 2px 2px #F93;
}
.link
{
text-decoration:none;
color:#4A2500;

}

Friday, 27 July 2018

Resmi Y2

Redmi Y2

Xiaomi Redmi Y2 smartphone was launched in June 2018. The phone comes with a 5.99-inch touchscreen display with a resolution of 720 pixels by 1440 pixels. Xiaomi Redmi Y2 price in India starts from Rs. 9,999.

The Xiaomi Redmi Y2 is powered by 2GHz octa-core processor and it comes with 3GB of RAM. The phone packs 32GB of internal storage that can be expanded up to 256GB via a microSD card. As far as the cameras are concerned, the Xiaomi Redmi Y2 packs a 12-megapixel primary camera on the rear and a 16-megapixel front shooter for selfies.

The Xiaomi Redmi Y2 runs Android 8.1 Oreo and is powered by a 3080mAh non removable battery. It measures 160.73 x 77.26 x 8.10 (height x width x thickness) and weighs 170.00 grams.

The Xiaomi Redmi Y2 is a dual SIM (GSM and GSM) smartphone that accepts Nano-SIM and Nano-SIM. Connectivity options include Wi-Fi, GPS, Bluetooth, Infrared, 3G and 4G. Sensors on the phone include Compass/ Magnetometer, Proximity sensor, Accelerometer, Ambient light sensor and Gyroscope.

general
Release date June 2018
Form factor Touchscreen
Dimensions (mm)160.73 x 77.26 x 8.10
Weight (g)170.00
Battery capacity (mAh) 3080
Removable batteryNo
ColoursDark Grey, Gold, Rose Gold
SAR value 1.12


DISPLAY
Screen size (inches)5.99
TouchscreenYes
Resolution720x1440 pixels


HARDWARE
Processor 2GHz octa-core
Processor makeSnapdragon 625
RAM 3 GB
Internal storage 32 GB
Expandable storage yes
Expandable storage type microSD
Expandable storage up to (GB) 256


CAMERA
Rear camera 12-megapixel
Rear FlashLED
Front camera 16-megapixel
Front Flash yes